
So I went shopping the other day at the local thrift store and came across a beautiful shirt in Viscose which is a 100% pure nature product. It had the tag on, so it was not even used. When I put it on I definitely could understand why. It is one of these trend items that has one season and then the shape or design has lost its appeal. So many clothes gets thrown to the thrash each year just because of that. Just here in Norway we throw away 113.000 ton of textiles each year.
So in my strive to create less trash I rather buy used clothes and fix them up a bit. Small alterations to a piece of clothing can make a RAG into FAB ❤

So this gorgeous goldfish printed shirt had a volume to fit approx 3 of me and a great shape if you have a humpback. Since I don’t have either, I wanted to size it down and get rid of the pleat in the sides of the back. I still want to keep some volume, but make it more wearable and timeless to fit into my closet.
This is an easy alteration operation you can apply to any blouse or men’s shirt. Just skip part 1 – 4, and move directly to part 5.
What I used;
- An iron
- A ironboard
- A pair of scissors
- Some pin needles
- A sewing machine
- White thread
- 1 Long ruler
- 1 Rounded ruler
- 1 Colored chalk pencil
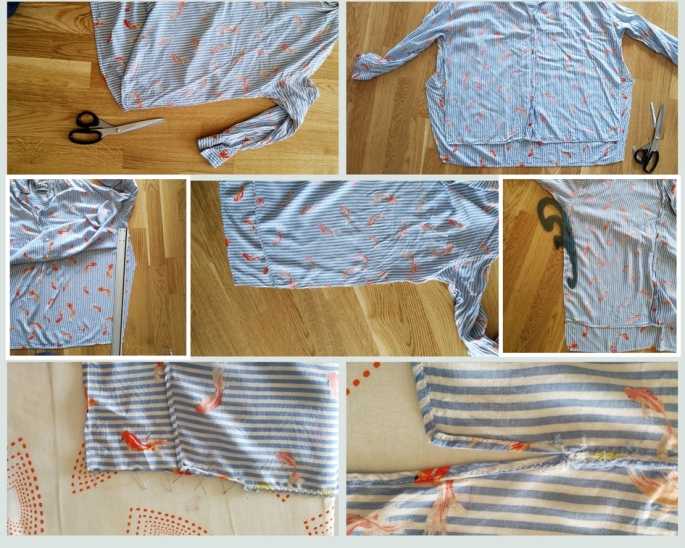
- I laid the blouse flat on the floor, then I cut off the side seam up to approx 5 cm from the armhole.
- Then I let the back pleat down, and gave it a little Ironing to make it totally flat.
- I removed the pleat just by drawing a new line from the edge of the fabric, and then cutting the extra fabric off.
- Then I used needles to pin the front and the back together again.
- When I had decided how much I wanted to remove from the volume (4 cm on each side), I marked that off on the fabric, and made sure it got a nice curve into the armhole.
- I wanted to have a split but still keep the length in the back, so I marked off 6 cm from the front end and up. Then I sewed it together by using a straight seam. After that I cut off the extra fabric, leaving 1 cm of the raw edge to overlock or zigzag. I used zigzag until the start of the split. Then I had to cut into the fabric very close to the seam, to be able to fold the hem to each side. Then Iron and pin the hem.
- Then I sewed the hem around the slit, but I should have sewn it even closer to the split to strengthen the seam. (I will do that later) Then Voila! Done! Got me a new fishy blouse ❤

What do you think? Would you dare to try to do something like this?
